This section describes the process of creating a scheduled work order.
To create a scheduled work order:
- Click Go To > Work Orders > Create Work Order.
- Select a BUILDING, TENANT, ISSUE TYPE, and FLOOR / SUITE.
- (Optional) Enter a specific LOCATION and ASSIGN TO.
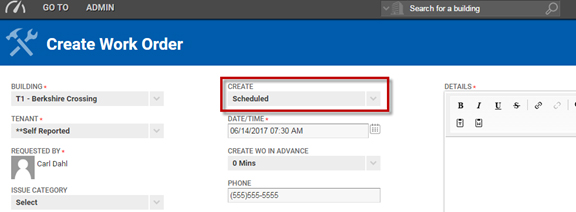
- Using the CREATE field, select Scheduled.
- Click the
 icon and select the DATE / TIME that the work order is to be created.
 - (Optional) To provide the assignee up to an hour of advanced notice of the work order, select a CREATE WO IN ADVANCE
- (Optional) Click Keep me informed to be notified when updates are made to the work order.
- (Optional) Click Critical to mark the work order as critical on the work order search grid and to change the header color to red.
- (Optional) Associating a geolocation to a work order can help mobile users locate a work order created in a large open area such as a parking lot or rooftop. To associate a set of geolocation coordinates to a work order:
- Click
 .
. - Using the GEOLOCATION map, click when the crosshairs are over the exact location of the problem being reported.
- Click SAVE.
- Click
- Enter the DETAILS of the work order.
- Click